
Grab your lab coat - we're building a microVM from a container

No more broken tutorials, build a microVM from a container, boot it, access the Internet
When I started learning Firecracker, I ran into frustration after frustration with broken tutorials that were popular in their day, but just hadn't been kept up to date. Almost nothing worked, or was far too complex for the level of interest I had at the time. Most recently, one of the Firecracker maintainers in an effort to make the quickstart better, made it even harder to use. (You can still get a copy of the original Firecracker quickstart in our tutorial on nested virtualisation)
So I wrote a lab that takes a container image and converts it to a microVM. You'll get your hands dirty, you'll run a microVM, you'll be able to use curl and ssh, even expose a HTTP server to the Internet via inlets, if (like me), you find that kind of thing fun.
Why would you want to explore Firecracker? A friend of mine, Ivan Velichko is a prolific writer on containers, and Docker. He is one of the biggest independent evangelists for containers and Kubernetes that I know.
So when he wanted to build an online labs and training environment, why did he pick Firecracker instead? Simply put, he told us that containers don't cut it. He needed something that would mirror the type of machine that you'd encounter in production, when you provision an EC2 instance or a GCP VM. Running Docker, Kubernetes, and performing are hard to do securely within a container, and he knew that was important for his students.
For us - we had very similar reasons for picking Firecracker for a secure CI solution. Too often the security issues around running privileged containers, and the slow speed of Docker In Docker's (DIND) Virtual Filesystem Driver (VFS), are ignored. Heads are put into the sand. We couldn't do that and developed actuated.dev as a result. Since we launched the pilot, we've now run over 110k VMs for customer CI jobs on GitHub Actions, and have a tech preview for GitLab CI where a job can be running within 1 second of pushing a "commit".
So let's get that microVM running for you?
How it works 🔬
How to build a microVM from a container
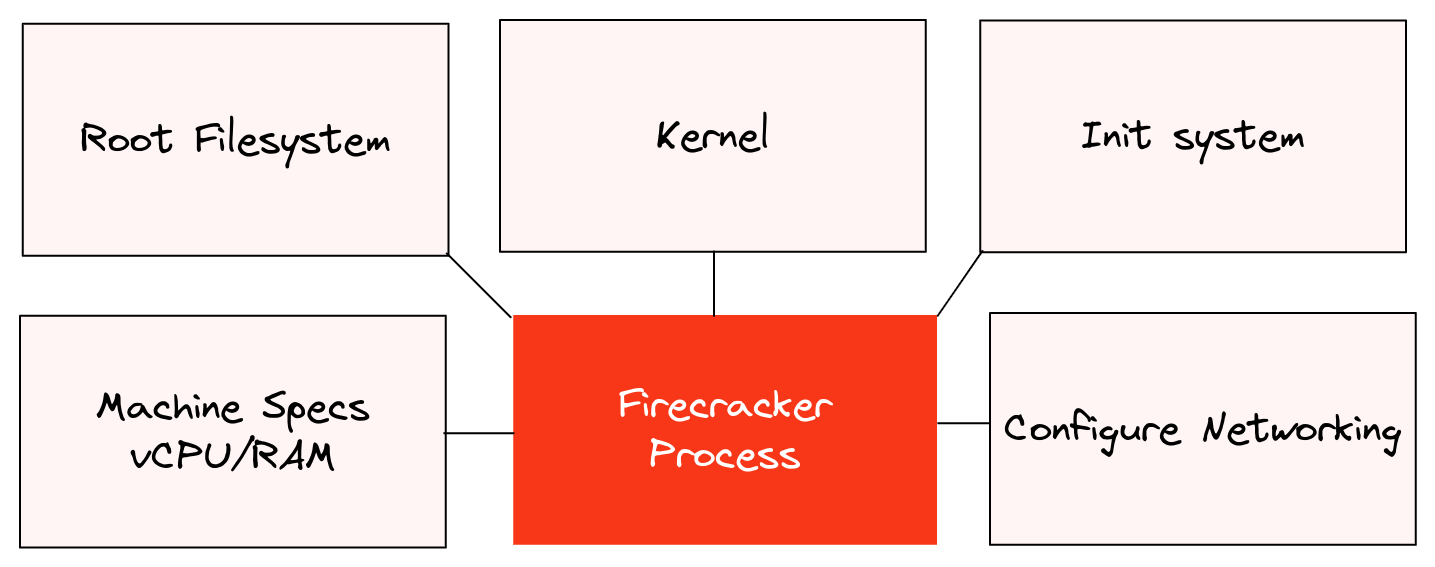
Conceptual archicture of the lab
Here's what we'll be doing:
- Build a root-filesystem from a container image from the Docker Hub
- Download a pre-built Linux Kernel from the Firecracker team
- Build an init system written in Go
- Build a disk image with the init system and root-filesystem
- Configure a networking tap device and IP masquerading
- Start a Firecracker process in the background
- Configure the Firecracker process via curl statements to a UNIX socket
- Finally, issue a boot command and try it out
Let's look at why we need a init, instead of just running the entrypoint of a container.
Whilst in theory, you can start a microVM where the first process (PID 1) is your workload, in the same way as Docker, it will leave you with a system which is not properly initialised with things like a /proc/ filesystem, tempfs, hostname, and other things that you'd expect to find in a Linux system.
For that reason, you'll need to either install systemd into the container image you want to use, or build your own basic init system, which sets up the machine, then starts your workload.
We're doing the latter here.
In the below program, you'll see key devices and files mounted, to make a functional system. The hostname is then set by using a syscall, and finally /bin/sh is started. You could also start a specific binary, or build an agent into the init for Remote Procedure Calls (RPC) to start and stop your workload, and to query metrics.
The team at Fly.io built their own init and agent combined, and opened-sourced a very early version: github.com/superfly/init-snapshot.
You'll find my init in: ./init/main.go:
// Copyright Alex Ellis 2023

package main

import (
	"fmt"
	"log"
	"os"
	"os/exec"

	"syscall"
)

const paths = "PATH=/usr/local/bin:/usr/local/sbin:/usr/bin:/usr/sbin:/bin:/sbin"

// main starts an init process that can prepare an environment and start a shell
// after the Kernel has started.
func main() {
	fmt.Printf("Lab init booting\nCopyright Alex Ellis 2022, OpenFaaS Ltd\n")

	mount("none", "/proc", "proc", 0)
	mount("none", "/dev/pts", "devpts", 0)
	mount("none", "/dev/mqueue", "mqueue", 0)
	mount("none", "/dev/shm", "tmpfs", 0)
	mount("none", "/sys", "sysfs", 0)
	mount("none", "/sys/fs/cgroup", "cgroup", 0)

	setHostname("lab-vm")

	fmt.Printf("Lab starting /bin/sh\n")

	cmd := exec.Command("/bin/sh")

	cmd.Env = append(cmd.Env, paths)
	cmd.Stdin = os.Stdin
	cmd.Stdout = os.Stdout
	cmd.Stderr = os.Stderr

	err := cmd.Start()
	if err != nil {
		panic(fmt.Sprintf("could not start /bin/sh, error: %s", err))
	}

	err = cmd.Wait()
	if err != nil {
		panic(fmt.Sprintf("could not wait for /bin/sh, error: %s", err))
	}
}

func setHostname(hostname string) {
	err := syscall.Sethostname([]byte(hostname))
	if err != nil {
		panic(fmt.Sprintf("cannot set hostname to %s, error: %s", hostname, err))
	}
}

func mount(source, target, filesystemtype string, flags uintptr) {

	if _, err := os.Stat(target); os.IsNotExist(err) {
		err := os.MkdirAll(target, 0755)
		if err != nil {
			panic(fmt.Sprintf("error creating target folder: %s %s", target, err))
		}
	}

	err := syscall.Mount(source, target, filesystemtype, flags, "")
	if err != nil {
		log.Printf("%s", fmt.Errorf("error mounting %s to %s, error: %s", source, target, err))
	}
}
What you'll need
Firecracker is a Virtual Machine Monitor (VMM) that leans on Linux's KVM functionality to run VMs. Its beauty is in its simplicity, however even though it doesn't need a lot, you will need KVM to be available. If you have a bare-metal machine, like your own PC, or an old server or laptop, you're all set. There's also plenty of options for bare-metal in the cloud - billed either on a per minute/hour basis or per month.
And finally, for quick testing, DigitalOcean, GCP, and Azure all support what is known as "Nested Virtualization". That's where you obtain a VM, which itself can start further VMs, it's not as fast as bare-metal, but it's cheap and works.
Finally, whilst Firecracker and actuated (our CI product) both support Arm, and Raspberry Pi, this tutorial is only available for `x86_64`` to keep the instructions simple.
Provision the machine
I'd recommend you use Ubuntu 22.04, so that you can copy and paste instructions from this tutorial.
Install Docker CE
curl -fsSL https://get.docker.com | sudo sh
Docker will be used to fetch an initial Operating System, to build the init system, and to customise the root filesystem.
Install arkade, which gives you an easy way to install Firecracker:
curl -sLS https://get.arkade.dev | sudo sh
Install Firecracker:
sudo arkade system install firecracker
Clone the lab
Clone the lab onto the machine:
git clone https://github.com/alexellis/firecracker-init-lab --depth=1

cd firecracker-init-lab
Update the networking script
Find out what the primary interface is on the machine using ip addr or ifconfig.
Edit ./setup-networking.sh:
IFNAME=enp8s0
The script will configure a TAP device which bridges microVMs to your host, then sets up IP forwarding and masquerading so that the microVMs can access the Internet.
Run ./setup-networking.sh to setup the TAP device.
Download the Kernel
Add make via build-essential:
sudo apt update && sudo apt install -y build-essential
Run make kernel to download the quickstart Kernel made available by the Firecracker team. Of course, you can build your own, but bear in mind that Firecracker does not have PCI support, so many of the ones you'll find on the Internet will not be appropriate.
This Makefile target will not actually build a new Kernel, but wil download one that the Firecracker team have pre-built and uploaded to S3.
Make the container image
Here's the Dockerfile we'll use to build the init system in a multi-stage build, then derive from Alpine Linux for the runtime, this could of course be anything like Ubuntu 22.04, Python, or Node.
./Dockerfile:
FROM golang:1.20-alpine as build

WORKDIR /go/src/github.com/alexellis/firecracker-init-lab/init

COPY init .

RUN go build --tags netgo --ldflags '-s -w -extldflags "-lm -lstdc++ -static"' -o init main.go

FROM alpine:3.18 as runtime

RUN apk add --no-cache curl ca-certificates htop

COPY --from=build /go/src/github.com/alexellis/firecracker-init-lab/init/init /init
I've added in a few extra packages to play with.
Run make root, and you'll see an image in your library:
docker images | grep alexellis2/custom-init

REPOSITORY                                                          TAG                                                                      IMAGE ID       CREATED         SIZE
alexellis2/custom-init                                              latest                                                                   f89aa7f3dd27   20 hours ago    13.7MB
Build the disk image
Firecracker needs a disk image, or an existing block device as its boot drive. You can make this dynamically as required, run make extract to extract the container image into the local filesystem as rootfs.tar.
This step uses docker create followed by docker export to create a temporary container, and then to save its filesystem contents into a tar file.
Run make extract
If you want to see what a filesystem looks like, you could extract rootfs.tar into /tmp and have a poke around. This is not a required step.
Then run make image.
Here, a loopback file allocated with 5GB, then formatted as ext4, under the name rootfs.img. The script mounts the drive and then extracts the contents of the rootfs.tar file into it before unmounting the file.
Start a Firecracker process
Now, this may feel a little odd or different to Docker users. For each Firecracker VM you want to launch, you'll need to start a process, configure it via curl over a UNIX socket, then issue a boot command.
To run multiple Firecracker microVMs at once, configure a different socket path for each.
make start
Boot the microVM
In another window, issue the boot command:
make boot
Explore the system
You're now booted into a serial console, this isn't a fully functional TTY, so some things won't work like Control + C. The serial console is really just designed for showing boot-up information, not interactive use. For proper remote administration, you should install an OpenSSH server and then connect to the VM using its IP address.
That said, you can now explore a little.
Add a DNS server to /etc/resolv.conf:
echo "nameserver 8.8.8.8" > /etc/resolv.conf
Then try to reach the Internet:
ping -c 1 8.8.8.8

ping -c 4 google.com

curl --connect-timeout 1 -4 -i http://captive.apple.com/

curl --connect-timeout 1 -4 -i https://inlets.dev
Check out the system specifications:
free -m
cat /proc/cpuinfo
ip addr
ip route
When you're done, kill the firecracker process with sudo killall firecracker, or type in halt to the serial console.
Wrapping up
I was frustrated by the lack of a simple guide for tinkering with Firecracker, and so that's why I wrote this lab and am keeping it up to date.
For production use, you could use a HTTP client to make the API requests to the UNIX socket, or an SDK, which abstracts away some of the complexity. There's an official SDK for Go and several unofficial ones for Rust. If you look at the sample code for either, you'll see that they are doing the same things we did in the lab, so you should find it relatively easy to convert the lab to use an SDK instead.
Did you enjoy the lab? Have you got a use-case for Firecracker? Let me know on Twitter @alexellisuk
If you'd like to see how we've applied Firecracker to bring fast and secure CI to teams, check out our product actuated.dev
Here's a quick demo of our control-plane, scheduler and bare-metal agent in action: